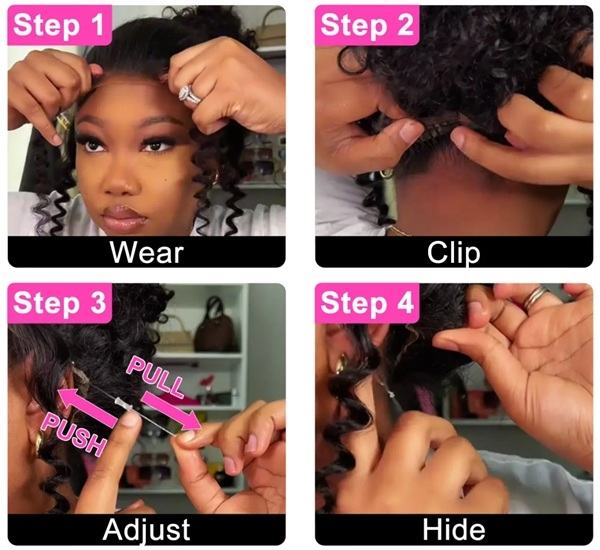


How To Put On A 360 Glueless Wig
When you get a 360 glueless wig, do you know how to put it on to ensure a natural look and comfortable fit? If you are unsure about the proper application, don’t worry. Following are some steps I carefully summarized that I think you need to take to make the 360 glueless human hair wig look seamless and stay in place throughout the day.
The installation of the 360 glueless is easy for anyone. Only five steps are needed.

Step 1: Preparation And Initial Placement
Adjust the elastic band, and fold 360 all around lace edge forward, prevent lace folding inward. And remember to align the edge with forehead and then wear the 360 glueless wig.
Step 2: Adjust By Holding The Wig Cap Not The Lace
Hold the wig cap to adjust, don’t hold the lace to prevent hair loss. The lace is delicate, and excessive tearing can lead to hair loss from the 360 glueless wig.
Step 3: Securing The Wig With Combs
To ensure the wig stays firmly in place throughout the day, even during active movement, you can clip three removable combs provided. Two of these combs should be clipped onto the sides of the wig, just above the ears. The third comb should be placed at the back of the wig, in the middle, near the nape of your neck.
Step 4: Customized The Cap Size
Pull and push the invisible drawstring to adjust cap size from 21 inches to 23.5 inches to get a customized cap size.
Step 5: Concealing The Drawstring
Hide the invisible drawstring of 360 glueless wig. To hide it, you can carefully tuck it under the hairline at the nape of your neck.
Above are all the installation steps about the 360 glueless wig I carefully organized for you. If you have different opinions or better methods, please leave a message to discuss.
The installation of the 360 glueless is easy for anyone. Only five steps are needed.

Step 1: Preparation And Initial Placement
Adjust the elastic band, and fold 360 all around lace edge forward, prevent lace folding inward. And remember to align the edge with forehead and then wear the 360 glueless wig.
Step 2: Adjust By Holding The Wig Cap Not The Lace
Hold the wig cap to adjust, don’t hold the lace to prevent hair loss. The lace is delicate, and excessive tearing can lead to hair loss from the 360 glueless wig.
Step 3: Securing The Wig With Combs
To ensure the wig stays firmly in place throughout the day, even during active movement, you can clip three removable combs provided. Two of these combs should be clipped onto the sides of the wig, just above the ears. The third comb should be placed at the back of the wig, in the middle, near the nape of your neck.
Step 4: Customized The Cap Size
Pull and push the invisible drawstring to adjust cap size from 21 inches to 23.5 inches to get a customized cap size.
Step 5: Concealing The Drawstring
Hide the invisible drawstring of 360 glueless wig. To hide it, you can carefully tuck it under the hairline at the nape of your neck.
Above are all the installation steps about the 360 glueless wig I carefully organized for you. If you have different opinions or better methods, please leave a message to discuss.
Share this post
Naijanetwork Forum Statistics
Threads: 15187,
Posts: 18288,
Members: 6816


