

No Dig Beds – Doing It Lasagna Way
in Agriculture

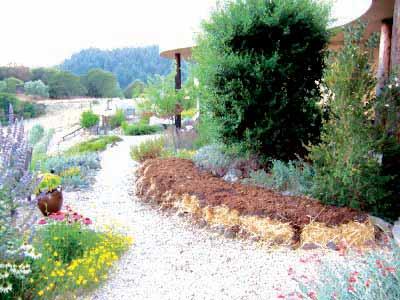
THERE are many variations of how to build a ‘‘no- dig garden” but they all use the same underlying principle, which is soil building. No-dig gardens can be constructed anywhere because this technique creates soil – a rich, dark, healthy, nutrient-filled humus which plants love. They can be constructed over soil, existing lawn or concrete.
There’s no such thing as a lazy gardener. But that doesn’t mean there aren’t ways to make gardening easier while still making it effective. ‘‘No-Dig” “Lasagna” gardening method also known as ‘‘sheet mulching” or layering method is one of those ways. Do away with weed-infested areas the easy way. Make new flower/vegetable beds in areas of poor soil by building it up. You can even skip weeding or sod removal. No Digging!
Build a raised bed first, if you wish. You can also finish your bed later, if you prefer.
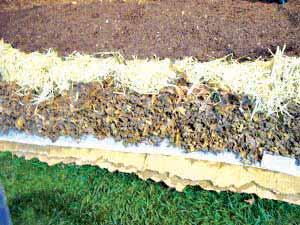
As a brief description, the way the technique of no-dig gardening works is that of different organic materials such as peas straw, alfalfa hay (Lucerne), animal manure, firely-chopped prunings, kitchen scraps, compost and laid down in layers (lasagna method) over each other to create what is essentially a thick, flat composting system that fills a garden bed, small ‘pockets’ or holes are made that hold as much compost as a small pot that you could grow the plant in, they are then filled with compost, and the plants planted in them. It is really simple and the results are incredible. Essentially the no-dig garden is constructed of alternating layers of carbon-rich and nitrogen-rich materials, just like a properly made compost heap.
What you’re doing when employing no-dig methods is turning the garden bed into a compost heap.

Building a No-Dig Garden
There are two main construction methods for building a no-dig garden: one is No-dig gardens built on concrete, paved areas or rocky ground. The second construction method is No-dig gardens built on existing gardens on existing garden beds or lawns. The only difference is that you need to add an extra layer first when building on hard or rocky surfaces.
You can build the no-dig garden over any surface over existing soil, lawn, concrete or paved surfaces – the first step of the
construction will vary depending on the surface.
Ideally it should be on a fairly even surface, and it should receive 5 hours or more of sunlight each day. Either mark out where the no-dig garden bed will be, and build it without ‘sides’ or edging, or construct a raised bed.
Gather Materials
You will need the following materials: Newspapers or cardboard, Animal Manure or organic fertilizer, straw bales or Lucerne (alfalfa hay) bales or both; compost.
Optional Materials:
Kitchen scraps, worm casting, rock dust.
If building on hard or rocky ground you’ll also need: dry small sticks and branches, old dry leaves, dry seaweed (optional).
You will also need the following items:
If using cardboard – bucket of water for soaking cardboard; watering can or hose for watering.
Preparing the Ground
If building over an existing garden bed or soil, no additional preparation is required. If building over concrete, paving, rocky ground or other hard surfaces, first lay down a layer of small sticks and branches, twigs and old dry leaves 7-10cm (3-4 inches) thick. This layer helps with drainage so water doesn’t pool on the hard surface and create a water-logged soil. You can also add dried seaweed (if you can get it) to this layer. If building over lawn or grass, you can mow the grass very low first, or just leave it. Next, fertilize it with plenty of blood and bone and lime, and then water it in. the fertilizer will help the grass rot down once it is covered up and buried under all the layers that will go on top of it.
Lay down Newspaper
Law down sheets of newspaper in layers approximately 0.5cm (1/4 inch thick); overlap the edges by 10-15 cm to prevent grass or weeds growing through. Using a watering can or hose, water newspaper well. This newspaper layer will hold moisture and act as a weed barrier. It will gradually breakdown over time. If using cardboard, you will need to pre-soak it in a bucket of water first, which is not as easy. The other issue with cardboard is that it contains glue made of borax, so it’s really a second choice. Use newspapers if they are available, and more importantly, do not use glossy printed paper or office paper, they contain toxic inks and bleaches, something you don’t want going into your food.’
Lay down Lucerne
Lay down a layer of Lucerne (alfalfa) approximately 10cm (4 inches) thick over newspaper using a watering can or hose water in well. You can use other carbon containing material such as peas straws, hay, sugarcane mulch, etc, but Lucerne is preferable because it has a higher nitrogen content than the other straw materials, and breaks down more easily. The carbon to nitrogen ratio (C: N) for Lucerne (alfalfa hay) is 18:1, while the straw is 80:1.
Lay down manure and compost
Sprinkle a thin layer of manure. You can also add compost to create a layer 5cm (2 inches) thick. Using a watering can or hose water in well.
Note: If you want to add other ingredients such as kitchen scraps, worm castings to your no-dig garden, this is the layer you add them to. Just use a thin layer, don’t overdo it! The worm castings and rock dust can also be used in the upcoming higher layers, but kitchen scraps need to be placed in this lower layer only to keep it well buried, this prevents vermin such as rats and mice digging it up to get to it.
Lay Down Straw
Lay down a layer of straw approximately 10cm (4 inches) thick over the layer of manure or manure/compost. Using watering can or hose, water in well. You can use carbon containing material here such as peas straw, hay, sugarcane mulch, etc, here.
Make Pockets of Compost in Top Layer and Plant Up
Make holes in the top layer of straw approximately 10-15cm (4-6 inches) wide, and equally deep. Fill with compost. Plant seeds, seedlings or plants. Using a watering can or hose, water in well.
You can also add seaweed extract to the water when you water in the seeds/seedlings or plants. Plants really do need more than the basic NPK (nitrogen, phosphorous, potassium) of chemical fertilizers. Seaweed contains just about every beneficial mineral, including all the trace elements that plants need, and it really helps your plants develop strong, healthy roots. Now you’ve finished, just step back and admire your newly constructed no-dig garden bed! It’s that easy, and that’s how you build it, in these simple steps!
No-Dig Garden Maintenance
To maintain any type of no-dig garden, after the plants are harvested and the growing season has ended, the layers will have rotted down into the soil, enriching and improving it. It’s then time to replenish the no dig layers. You’ll replenish them at the end of each major season.
To replenish the layers of the no-dig garden:
Add a layer of manure as before (and compost if you wish, which is optional), cover the manure/compost layer with a layer of straw. Water it in.
So in conclusion, with no-dig gardening, you can reduce your effort and time spent in the garden, save enough water, maintain a healthy soil ecology, and let Nature do the work. It’s the way Nature does replenish the earth and a sustainable way you can garden.
Warnings
Never use dog, cat or human feces in your garden beds. These contain pathogens that can live for a long time, even in a compost pile. And only use previously composted cow or horse manure. Unlike a compost pile, this method will not reach the temperatures necessary to kill any bacteria in the manure.
The steps above outline just one of the many no-dig gardening ‘formulas.’ There are many ways to build no dig gardens, and there are many recipes for what to use for each layer. Some no-dig gardens can be very high and free-standing, while others can be low. They all work because they use the magic formula that we also use in composting, alternating layers of carbon-rich materials and nitrogen-rich materials.
Source: TheGuardian
Share this post
Naijanetwork Forum Statistics
Threads: 15379,
Posts: 18503,
Members: 6897


